Overview
在网站开发的过程中,通常一个网站会有一个整体的风格,页面都有很多共同的菜单,横栏的底部信息。以前我们会采用include标签在每个jsp页面中来不断的包含各种header, stylesheet, scripts and footer,现在,在sitemesh的帮助下,我们不必再使用这种方式来保持风格统一了。
关于SiteMesh概述
sitemesh的设计思想是装饰者(decorator)设计模式。
关于装饰者(decorator)设计模式
尝试着简短的几句话介绍清楚,发现很难..列一个官方的定义:
The Decorator Pattern attaches additional responsibilities to an object dynamically. Decorators provide a flexible alternative to subclassing for extending functionality. (装饰者模式可以动态地给一个对象增加其他职责。就扩展对象功能来说,装饰者模式比生成子类更为灵活。)
详细的关于装饰者设计模式的资料,推荐下面两篇文章:
1.http://blog.chinaunix.net/uid-20761674-id-304542.html
2.http://www.cnblogs.com/rush/archive/2011/05/08/Decorator_DesignPattern_NETFramework.html
SiteMesh
首先看一下SiteMesh的工作过程图:
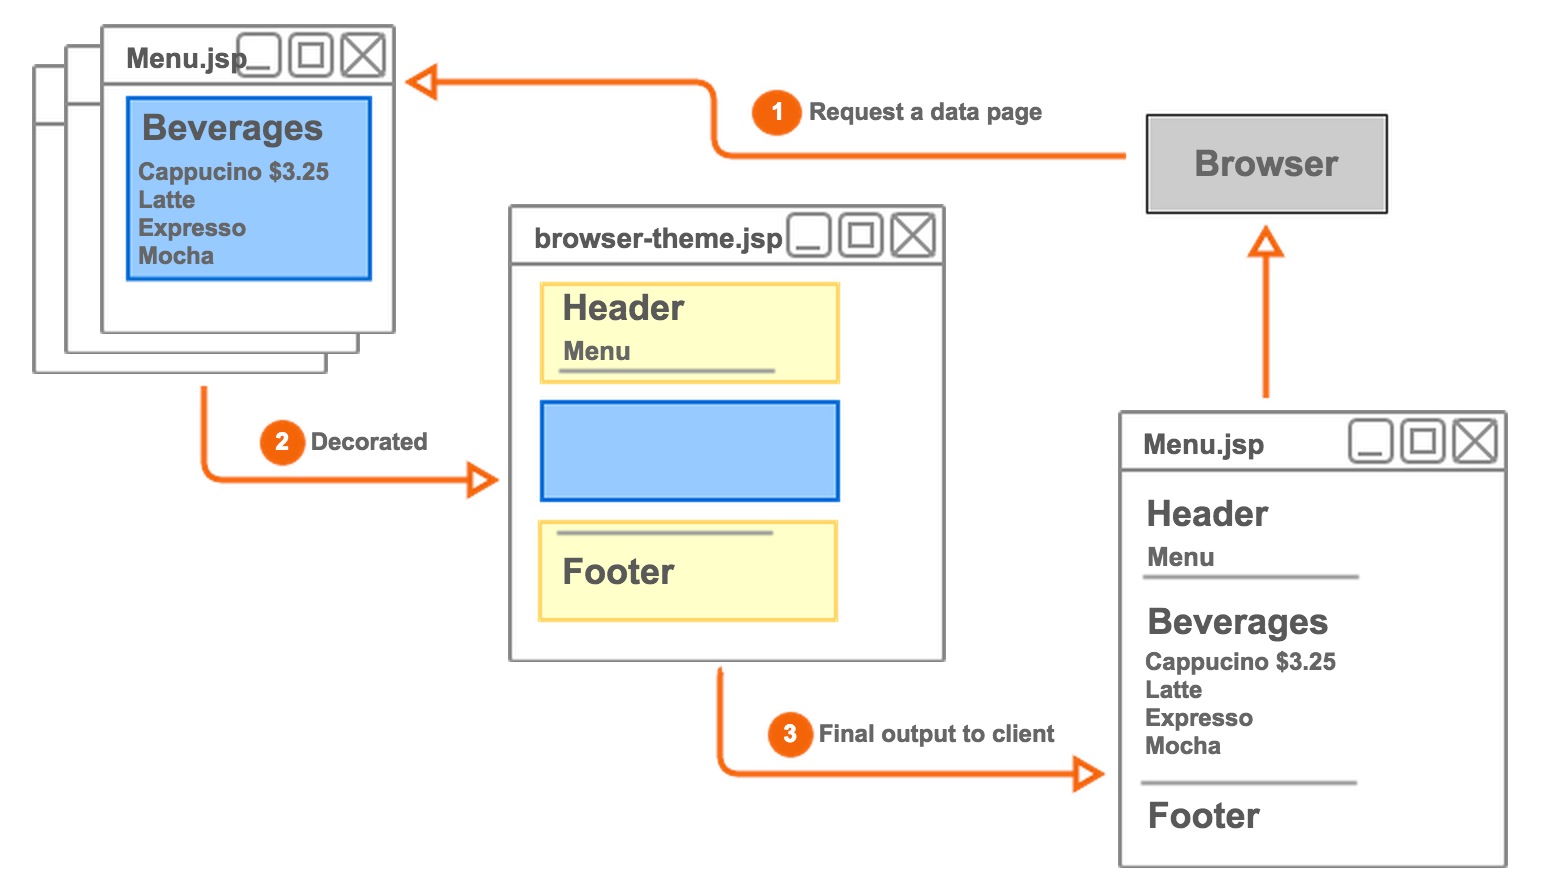
从宏观上来看上图,Header和Footer都是在每个界面都是固定或者有细微变化的(但不会有结构上的变化),改变的只是中间的元素。这时候我们可以编写一个decorator页面(上图中的browser-theme.jsp),这样在编写实际的展示页面(左上角的Menu.jsp)时,只需要去展示实际上不同的界面,并指定它需要哪个decorator修饰,这样在返回结果时,实际上是decorator和实际的展示页面组合成的新页面,如上图中右下角的Menu.jsp界面。
看得出来,SiteMesh使得我们可以不必在每个界面都重复编写相同的模板性元素,而只需要专注于实际需要展示的内容。
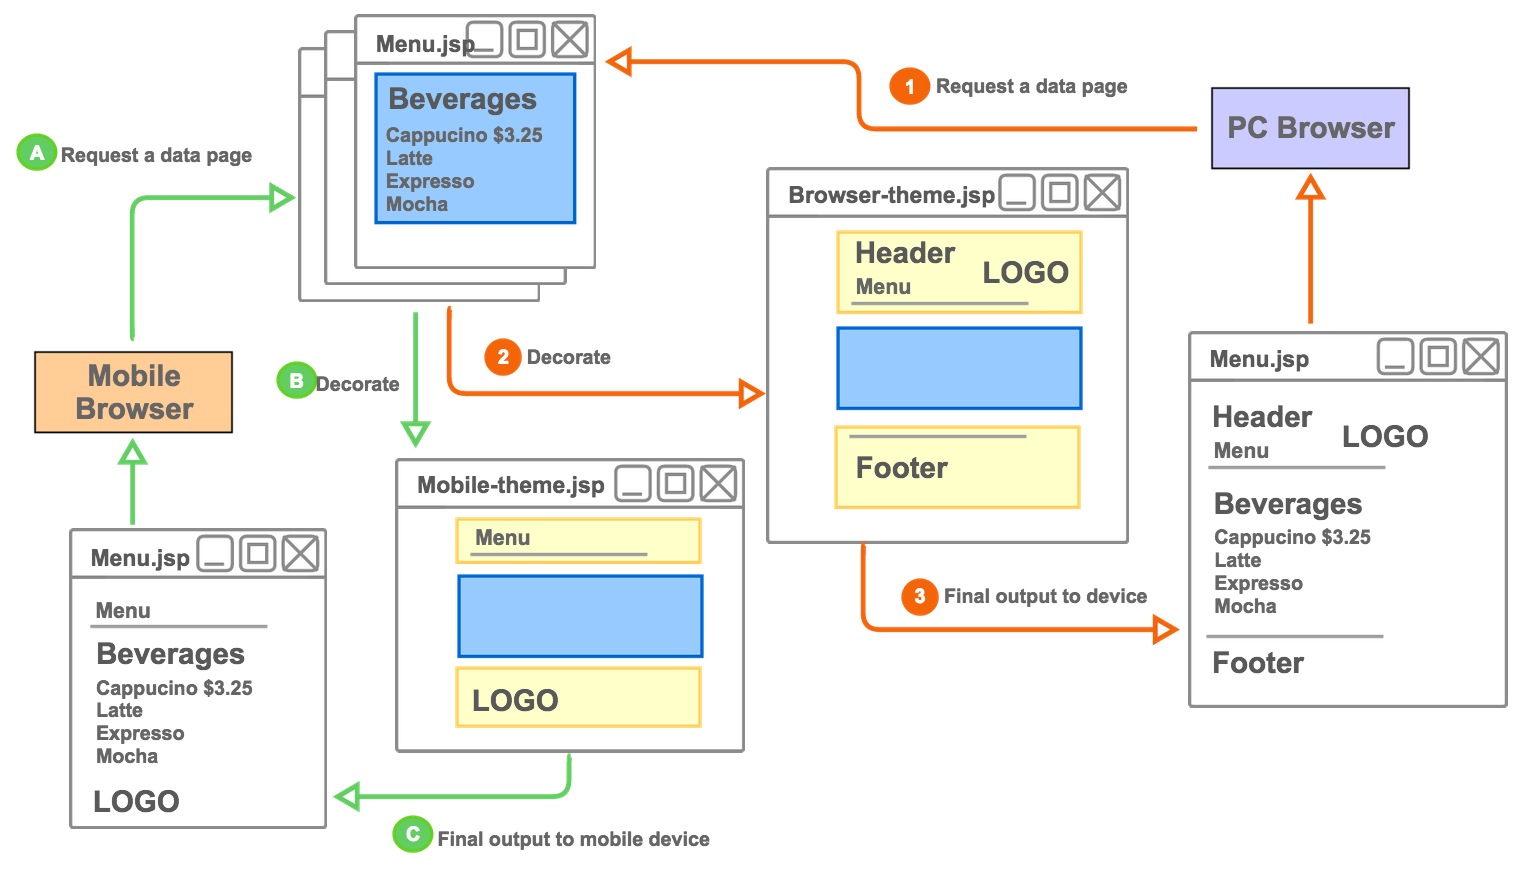
而且,使用SiteMesh可以实现更大的灵活性,给界面指定不同的decorator,比如下图中,使用手机浏览器和网页浏览器访问Menu.jsp时,该页面是被不同的decorator修饰,最终返回不同的组合界面。
如何使用SiteMesh
1.在WEB-INF/web.xml中添加以下filter的定义:
    <!-- SiteMesh -->
    <filter>
        <filter-name>sitemeshFilter</filter-name>
        <filter-class>
            com.opensymphony.sitemesh.webapp.SiteMeshFilter
        </filter-class>
    </filter>
    <filter-mapping>
        <filter-name>sitemeshFilter</filter-name>
        <url-pattern>/*</url-pattern>
    </filter-mapping>
sitemesh老版本的filter是PageFilter。 目前这个Filter已经过时,使用新的SiteMeshFilter。
2.将所需要的sitemesh.jar copy至WEB-INF/lib,如果使用Maven。不需要手动管理jar包,直接在pom.xml中添加以下依赖:
    <dependency>
        <groupId>opensymphony</groupId>
        <artifactId>sitemesh</artifactId>
        <version>${sitemesh.version}</version>
        <scope>runtime</scope>
    </dependency>
其中,${sitemesh.version}是一个pom中自定义的版本号,我们使用的为2.4.2。
3.建立WEB-INF/decorators.xml描述各装饰器页面,可仿照sitemesh例子。 如下所示:
    <decorators defaultdir="/WEB-INF/views>
        <decorator name="default" page="layouts/default.jsp">
            <pattern>*</pattern>
        </decorator>
    </decorators>
这其中,我们使用了<decorator>标签来声明了一个叫default的装饰器,<pattern>子标签指定了该标签可以用来装饰所有的请求页面,这样,当客户端请求任何一个页面时,实际上都是由default装饰器修饰之后,返回一个组合界面。
既然需要default装饰器修饰,那么需要可以找到实际上这个装饰器页面default.jsp在哪里。这里注意decorators的defaultdir属性,该属性指定了所有装饰器的具体存放路径前缀,根据<decorators>的defaultdir属性和<decorator>的page属性,就可以准确定位到每一个decorator的装饰页地址。比如,上述default装饰器页面实际放在/WEB-INF/views/layouts/default.jsp中。
4.建立default.jsp界面:
<%@ page contentType="text/html; charset=GBK"%>
<%@ taglib uri="sitemesh-decorator" prefix="decorator" %>

<html>
  <head>
    <title>
        <decorator:title default="装饰器页面..." />
    </title>
    <decorator:head />
  </head>
  <body>
    sitemesh的例子<hr>
    <decorator:body />
    <hr>chen56@msn.com
  </body>
</html>
注意
<%@ taglib uri="sitemesh-decorator" prefix="decorator" %>这句代码,为了在后面的jsp界面中使用decorator前缀,如<decorator:head />,需要声明该prefix并指定uri以让编译器知道应该去哪里寻找decorator的定义文件,上述的代码指定了一个本地定义文件,sitemesh-decorator,因此需要手动将sitemesh包种的sitemesh-decorator.tld和sitemesh-page.tld文件放到/WEB-INF/文件夹下。
实际上,新版本的sitemesh中,可以不必这么做,下面结合我们自己的项目讲解的时候会再说明。装饰器jsp里使用的前缀还是
decorator,新版本的已经变成了sitemesh,并且不再需要手动添加sitemesh-decorator.tld和sitemesh-page.tld文件到本地。后面一并解释。
5.建立一个的被装饰页面 /index.jsp(内容页面)
    <%@ page contentType="text/html; charset=GBK"%>
    <html>
      <head>
        <title>Agent Test</title>
      </head>
      <body>
        <p>本页只有一句,就是本句.</p>
      </body>
    </html>
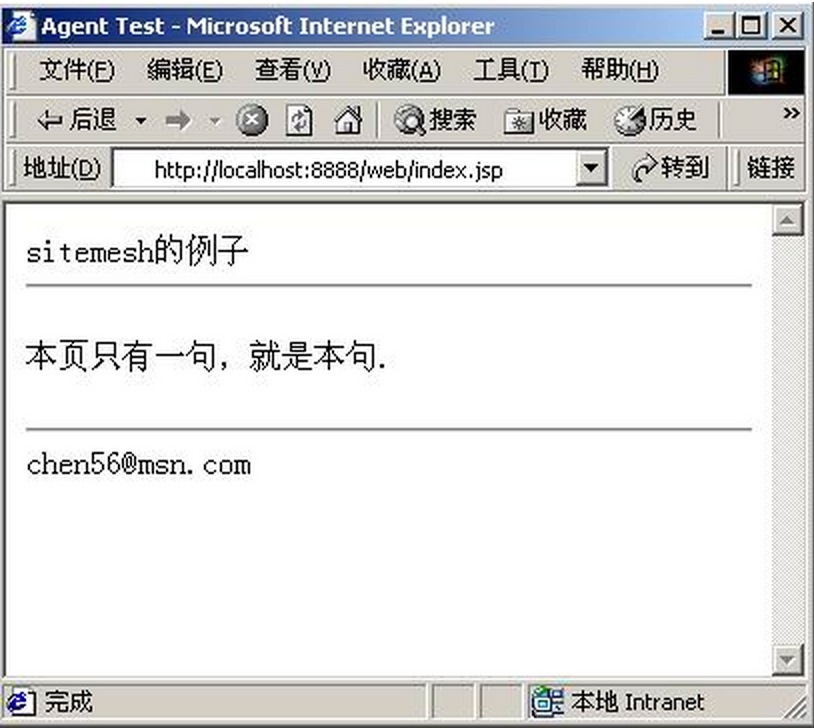
6.当客户端请求/index.jsp界面时,首先会被web.xml中的sitemesh filter拦截,然后去查看有没有decorator可以匹配/index.jsp,结果发现default.jsp声明可以匹配一切界面。当返回/index.jsp的结果时,实际上会将这两个界面拼起来,最后返回给客户端。 如下所示:
实际项目中使用到的SiteMesh
第1,2步与上文没有区别,因此下面直接从3开始讲解。
3.建立WEB-INF/decorators.xml描述各装饰器页面:
    decorators.xml:

    <?xml version="1.0" encoding="UTF-8"?>
    <!DOCTYPE xml>
    <decorators defaultdir="/WEB-INF/views">

        <!-- 默认装饰页面, 在需要装饰的页面增加<meta name="decorator" content="default"/> -->
        <decorator name="default" page="layouts/default.jsp" />
        <decorator name="default_mb" page="mobile/layouts/default.jsp" />

        <!-- CMS基础主题装饰页面 -->
        <decorator name="cms_default_basic" page="modules/cms/front/themes/basic/layouts/default.jsp" />
        <decorator name="cms_default_zgxj_blue" page="modules/cms/front/themes/zgxj_blue/layouts/default.jsp" />

    </decorators>
看得出来,跟上面例子唯一的区别在于decorator不再显式声明它要修饰的页面,而是改由要被修饰的页面主动制定要被谁修饰。在第5步中介绍。
4.建立default.jsp界面:
    default.jsp:

    <%@ page contentType="text/html;charset=UTF-8"%>
    <%@ include file="/WEB-INF/views/include/taglib.jsp"%>
    <%@ taglib prefix="sitemesh" uri="http://www.opensymphony.com/sitemesh/decorator" %>
    <!DOCTYPE html>
    <html style="overflow-x:hidden;overflow-y:auto;">
        <head>
            <title><sitemesh:title/></title>
            <%@include file="/WEB-INF/views/include/head.jsp" %>
            <sitemesh:head/>
        </head>
        <body>
            <sitemesh:body/>
        </body>
    </html>
可以看到,跟上文的区别主要有两点,主要在<%@ taglib prefix="sitemesh" uri="http://www.opensymphony.com/sitemesh/decorator" %>这句代码的区别。
- 首先前缀不再使用
decorator,而是使用sitemesh,uri也不再使用本地的定义文件,而是使用远程站点的uri。 - 顺理成章,下面都使用了
sitemesh前缀,如<sitemesh:body/>。
5.建立一个的被装饰页面 /sysIndex.jsp,地址为(src/main/webapp/WEB-INF/views/modules/sys/sysIndex.jsp),代码如下:
    sysIndex 片段:

    <%@ page contentType="text/html;charset=UTF-8" %>
    <%@ include file="/WEB-INF/views/include/taglib.jsp"%>
    <html>
        <head>
        <title>利安管家卡后台</title>
        ...//省略代码

        <meta name="decorator" content="default"/>

            ...//省略代码

        </head>

            ...//省略代码
这里面需要注意一句代码:
<meta name="decorator" content="default"/>显式指定了该页面需要被哪个decorator修饰。content 中指定的就是decorator的名字。
因此当请求该页面的时候,会在返回结果时自动找到default.jsp进行组装,最后返回完整的融合信息给客户端。
本文参考了:
想要参考更多的话:
- 官方的文档(其实不是很全,缺失很多部分):
http://wiki.sitemesh.org/wiki/display/sitemesh/Learn+-+Getting+Started+with+SiteMesh - 一个使用
springMVC与SiteMesh结合的例子:
https://fahadshaon.wordpress.com/2012/07/24/sitemesh-2-with-spring-mvc-3-multiple-layout-for-multiple-controller/